Lately, I’ve found myself getting bored with my go-to hot pink nail polish, and decided it’s time to spice up my nail routine! Try some of these fun nail trends to add a bit of sparkle and spunk to your look.
Pearls
Start by applying two coats of nail color – I like to keep it classy with light pink. While your nails are still wet, dip a toothpick in nail glue and use this to pick up a tiny pearl. Place the pearl on your nail into the wet nail polish. Wait for the polish to dry, and then cover your nails in a clear topcoat. And Le Voila! A chic and creative DIY nail design!


News Worthy
Grab a newspaper and cut out 10 small pieces, large enough to cover your nails. Apply two coats of polish – lighter colors tend to work better. Once your nails have had time to dry, dip the first nail in rubbing alcohol and place a piece of the newspaper on your nail, holding it in place for about 30 seconds. Carefully remove the newspaper, and paint a clear coat to seal the look together!

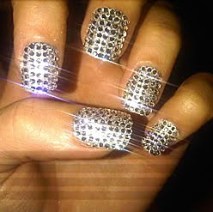
Diamonds
Start by applying two coats of nail color – again, I’d stick with something neutral like a light pink. Use a toothpick or wooden nail stick dipped in clear nail polish to pick up the tiny rhinestones. Place the rhinestones first on the outer edges of the nail, and work your way in until the entire nail is filled in. Go for a daring look by covering all 10 nails in rhinestones, or pick one finger on each hand to bedazzle. Either way, you’re sure to get a raving review!

Lacey
Pick out a piece of colored lace at your local fabric or arts and crafts store – Michael’s and Hobby Lobby always have fun colors to choose from. Cut the lace into 10 small squares just larger than the size of your nail. Starting with one finger at a time, apply one coat of brush-on nail glue – I like 5 Second Brush On Nail Glue, which is available at most drugstores. Lay a piece of lace over this glue, and let dry. Once the glue has dried, take a small scissors and trim the excess fabric so the lace fits your nail. Apply a second coat of the nail glue, and allow the nail to dry until the lace feels hard. File around your nail to smooth out any rough edges of lace, and finish with a glossy clear topcoat, and you’re ready to go!


Fishnets
Get a pair of fish nets and cut out 10 pieces, small enough to just lay over each nail. Brush on one layer of a light colored polish, and let it dry – for a fun twist, try a metallic silver. After the first coat has had time to dry, brush on a second coat of a darker color, and immediately press a piece of the fish net onto the wet paint. Be careful to not press down on to the nail, but instead fold the fish net down over the side of each finger. Next, carefully peel back the stocking to reveal the pattern. Repeat over the rest of your nails without using a top coat – the two colors tend to smear together!

Sally Hansen, Salon Effects!
Want to try a fun nail design but don’t really have the time to DIY? Check out these Sally Hansen Salon Effects press on nail designs! Available at any drug store, these are so simple to use, you can literally apply them during rush hour traffic while chugging down your soy latte.
These are all so fun a simple that there’s really no reason to not have fabulous nails all summer long! Try these out and post photos of your finished product!
XOXO,
Lauren
